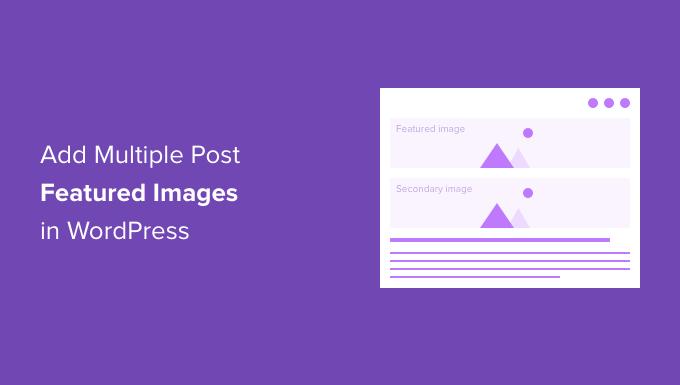
By default, WordPress only lets you add a single featured image per post.
But if you’re running a more visual site or want your content to really stand out, you might be asking yourself, ‘Can I add more than one?’ 🤔
The answer is yes!
We’ve gotten tons of questions from readers asking how to add multiple featured images. And honestly, it’s a total upgrade for any image-heavy blog, product showcase, or rich media content. 📸✨
In this guide, we’ll walk you through the steps to add multiple post thumbnails or featured images to your WordPress site.
Why Add Multiple Featured Images in WordPress?
Featured images are a default WordPress feature, and you’ll find them in every WordPress theme.
They help bring life to your content and make your blog posts more engaging. Plus, they help capture users’ attention and make them click on your article.
There are situations where you might need to add multiple post thumbnails to your WordPress website. Maybe a client has a special requirement to use more than one thumbnail, or your website design requires various images.
For example, sections like the homepage or archive pages (the blog and category section) require different image sizes. In this case, having an option to display multiple thumbnails is really useful.
On WPBeginner, we use multiple featured images for archive pages, social media, and thumbnails that appear in a blog post. Here’s a thumbnail that appears within the blog post:
On the other hand, the images that appear on archive pages are different.
Here’s a look at how thumbnails appear in the blog section on WPBeginner:
Now, we’ll show you how to add multiple thumbnail images in WordPress as well as a bonus tip. Here’s a quick overview of the topics we will discuss in this guide:
Ready? Let’s get started.
Adding Multiple Featured Images in WordPress (Without a Plugin)
The simplest way of adding multiple featured images without plugins is by manually placing them in your content in the WordPress content editor.
First, you can upload your primary thumbnail using the default featured image option in the WordPress content editor.
Simply click the gear icon at the top to open the settings panel on the right and then go to the ‘Featured image’ section.
After that, you can click the ‘Set featured image’ area, and the WordPress media uploader will pop up.
Go ahead and upload your picture or select an image from your existing media library.
After selecting an image, simply click the ‘Set featured image’ button.
The next step is to add an image block anywhere in the content to insert another featured image.
For this, you’ll want to click the ‘+’ button and then add an image block where you want to display the secondary featured image.
Once the image block is added, simply upload the thumbnail to your blog post.
Alternatively, you can select an existing image from your WordPress website’s media library or use the ‘Insert from URL’ option.
You can even add a gallery block and show multiple featured images. This is especially useful if you have an eCommerce store or need to show numerous high-quality product images.
For more details, please see our guide on how to create an image gallery in WordPress.
You can now visit your WordPress website to see multiple featured images.
Bonus Tip: Assigning Featured Images for Different Categories
If you want to show a different featured image for articles in a particular category, then the best solution is to use the Category Featured Image plugin.
First, you’ll need to install and activate the Category Featured Image plugin. If you need help, feel free to check out our guide on how to install a WordPress plugin.
Once the plugin is active, you can go to Post » Categories from your WordPress dashboard. You’ll now see a new ‘Featured image’ option when adding new categories or subcategories.
Simply click the ‘Add new image’ button to get started.
Once you click the button, the WordPress media uploader will pop up.
You can upload your image from your computer’s local drive or select one from your WordPress media library. After that, simply click the ‘Set featured image’ button.
You can also edit existing categories on your website and add a featured image.
To do this, first hover over any current category and click the ‘Edit’ option.
After that, scroll down to the ‘Featured image’ section.
Go ahead and click the ‘Add new image’ button and upload your featured image for the category.
Don’t forget to click the ‘Update’ button when you’re done.
And that’s it!
You can now go back to the ‘Categories’ page in your WordPress admin panel and see the featured image for each category.
We hope this article has helped you learn how to add multiple post thumbnails / featured images in WordPress. Next, you might want to see our guide on how to do basic image editing and how to create flipbox overlays and hovers in WordPress.
If you liked this article, then please subscribe to our YouTube Channel for WordPress video tutorials. You can also find us on Twitter and Facebook.